Carburetor Problems

Renault & Alpine General Discussion

Moderators: eastlmark, BIG_MVS, phildini, Test Moderator, Alpineandy

User avatar
User

johnb

Rank

Club Member

Club Member
Posts

858

Joined

Wed Sep 13, 2006 6:57 pm

Location

Cheshire


Has thanked: 13 times
Been thanked: 25 times

Re: Carburetor Problems

Postby johnb » Fri Dec 27, 2013 12:46 pm

MFaulks wrote:.
Oooo nice flames John :mrgreen: I know I said tune for maximum smoke, but .... :lol: :lol: :lol:


Yes, just need to get it directed in the opposite direction then it might do some useful work.
User avatar
User

JohnC

Rank

Non Member

Posts

2120

Joined

Sun Dec 02, 2007 6:19 pm

Location

Jersey C.I.


Has thanked: 15 times
Been thanked: 83 times

Re: Carburetor Problems

Postby JohnC » Sat Dec 28, 2013 10:50 am

johnb wrote:.........and not timing chain related.

John,
If you eventually decide that the timing chains need checking, I have a method which is pretty accurate that does not involve removing the timing chain covers and all that that involves..... it only involves removing the rocker covers. Let me know (if you don't already know that method) if you would like details when the time comes.
One other question ..... so I am not accused of "teaching my grandmother to suck eggs" so to speak :lol: :lol: :lol: ........ the term...."rocking valves" or "valves on the rock"..... are you "au fait" with these ?
John
1990 GTA Atmo, 2003 Jaguar X type 2.5SE Auto, 2018 Kia Picanto GT-Line-S 1.25
User avatar
User

johnb

Rank

Club Member

Club Member
Posts

858

Joined

Wed Sep 13, 2006 6:57 pm

Location

Cheshire


Has thanked: 13 times
Been thanked: 25 times

Re: Carburetor Problems

Postby johnb » Sat Dec 28, 2013 3:23 pm

JohnC wrote: ........ the term...."rocking valves" or "valves on the rock"..... are you "au fait" with these ?
John

I think so John. My understanding of rocking valves is when the piston is at TDC and the exhaust valve is almost closing and the inlet valve has just started to open, i.e. the overlap point when both valves are slightly open. According to the books that I have, you set the crankshaft at TDC and then the 1,2,3 camshaft in the valve rocking position for cylinder 1 and fit the chain with its marks lined up on the crank sprocket and the cam sprocket. Then rotate the crankshaft 150 degrees clockwise and position 4,5,6 camshaft with cylinder 6 valves rocking and then fit the chain to the crank sprocket and cam sprocket marks.
To set the distributor position, following the book procedures, needs both cylinder 1 valves closed, at TDC, i.e. on the firing stroke. This position being 360 degrees from the cylinder 1 valve rocking position. The distributor rotor 'contact' should then be opposite the mark on the distributor base and the cylinder 1 contact in the distributor cap.

Hopefully all the above is correct but if you see any problems please let me know. Today I've been checking all my build photos and, up to now, everything seems to be as it should. To find TDC on the firing stroke of cylinder 1 again, I've been cranking the engine on the remote start with the ignition off, cylinder 1 spark plug out and stopping the cranking just after I feel the pressure coming out of the plug hole. The timing mark on the crank pulley then being close to TDC. Another check is that I know the position of the 4,5,6 camshaft at TDC firing of cylinder 1 from the build photos. This can be viewed through the small cover over the end of the 4,5,6 camshaft.

johnb wrote:If you eventually decide that the timing chains need checking, I have a method which is pretty accurate that does not involve removing the timing chain covers and all that that involves.....
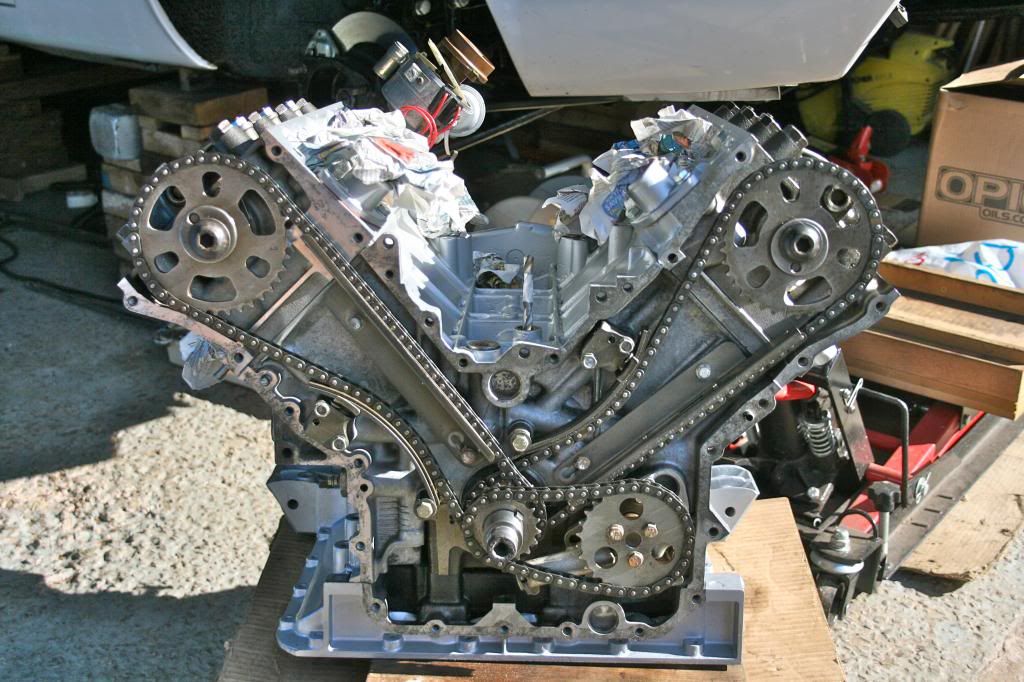
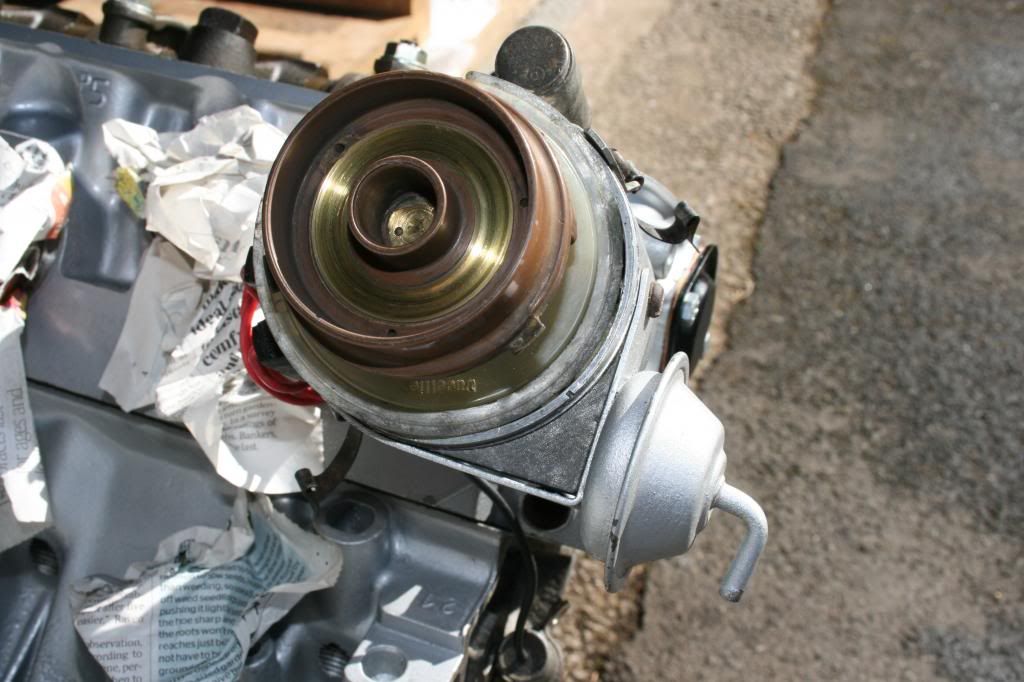
I don't know this method. I can only guess that it has something to do with looking at rocker positions relative to the crank timing mark positions. If it's not too much trouble to provide the procedure then it can only help in verifying, or otherwise, what I've done. I'm trying to avoid removing the rocker covers because I used sealant on the gasket faces when I fitted the covers and if they're removed the gaskets will probably be useless afterwards and they don't seem to be easy to obtain.

For information these are photos just after setting cylinder 1 to TDC on the firing stroke and fitting the distributor. If you spot anything not right please advise.

Image
Image
User avatar
User

johnb

Rank

Club Member

Club Member
Posts

858

Joined

Wed Sep 13, 2006 6:57 pm

Location

Cheshire


Has thanked: 13 times
Been thanked: 25 times

Re: Carburetor Problems

Postby johnb » Sat Dec 28, 2013 3:29 pm

MFaulks wrote:.
then loosen the distributor and advance it a bunch, sounds like you are well off and retarded .
Martin


Just a thought Martin. If you recall, on your recommendation, I fitted GTA camshafts on this engine build. The book timing for the A310 engine is 10 degrees BTDC. I believe the GTA timing is 15 degrees BTDC. With you saying it sounds retarded, should it now be timed for the GTA setting, if 15 degrees is correct, or some other advance number?
User avatar
User

JohnC

Rank

Non Member

Posts

2120

Joined

Sun Dec 02, 2007 6:19 pm

Location

Jersey C.I.


Has thanked: 15 times
Been thanked: 83 times

Re: Carburetor Problems

Postby JohnC » Sat Dec 28, 2013 10:41 pm

johnb wrote:My understanding of rocking valves is when the piston is at TDC and the exhaust valve is almost closing and the inlet valve has just started to open, i.e. the overlap point when both valves are slightly open.

Right John... you're spot on with that, that saves me some time. :P
However... I am not too sure where to start with the rest. So I will try to take it in bits, but I am sure there are others who know these PRV engines better than me, so I expect some corrections along the way.
According to the books that I have, you set the crankshaft at TDC and then the 1,2,3 camshaft in the valve rocking position for cylinder 1 and fit the chain with its marks lined up on the crank sprocket and the cam sprocket. Then rotate the crankshaft 150 degrees clockwise and position 4,5,6 camshaft with cylinder 6 valves rocking and then fit the chain to the crank sprocket and cam sprocket marks.

I have not come across this way of cam shaft timing, and I have to say I don't think it is a very accurate way to do this task. (First barrage here please :lol: )...... Now I have assumed that the 6cyl 310 PRV is the same as the GTA PRV but with a different ignition system. (Second barrage...) and as such I have looked at the process of setting the cam shafts the GTA way, and it does seem to be a bit more sophisticated and accurate way.
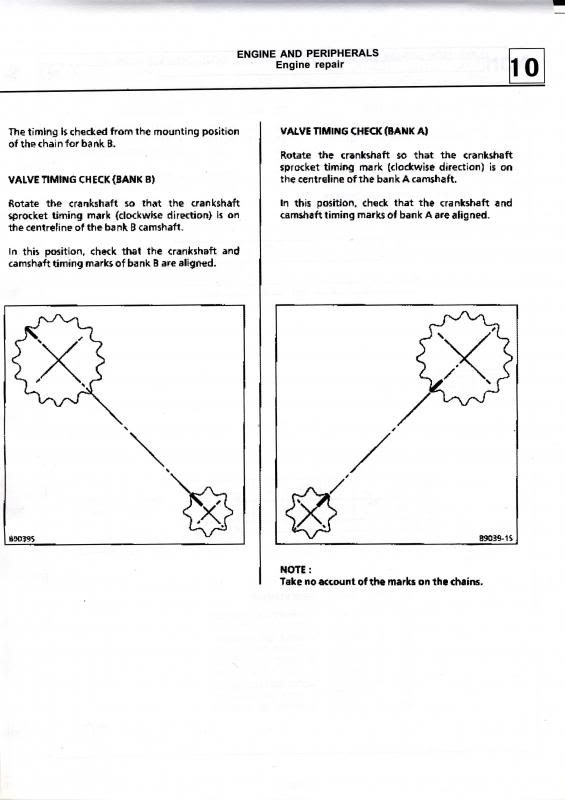
If you go to the Technical Help section of this site, Click on "PRV Engine" and download the "GTA & 610 Engine manual" English version, scroll down to pages 83 through 86, the process is certainly different. You may have to read it a few times to make sense of the different way to do the B bank but I think pages 83 & 84 are the right ones for the 310, but page 86 refers to both Bank B types and I have to assume that page 86 shows the final test of the process (Third barrage...)
Unfortunately your pic of the timing chains does not show up the timing marks on the gear wheels sufficiently to comment further.
To set the distributor position, following the book procedures, needs both cylinder 1 valves closed, at TDC, i.e. on the firing stroke. This position being 360 degrees from the cylinder 1 valve rocking position. The distributor rotor 'contact' should then be opposite the mark on the distributor base and the cylinder 1 contact in the distributor cap.

I have no problem with that except that I would use the valves on cylinder 5 being on the rock to get a more accurate TDC (together with your pointer or drill bit) to get cylinder 1 on the firing stroke...... it really is the same, but that's my preference.

To find TDC on the firing stroke of cylinder 1 again, I've been cranking the engine on the remote start with the ignition off, cylinder 1 spark plug out and stopping the cranking just after I feel the pressure coming out of the plug hole. The timing mark on the crank pulley then being close to TDC.

I would be doing all of these tests with the plugs removed and a socket and ratchet lever on the crank pulley, that way you can back off if necessary and come back to a very accurate position of, say, TDC. and you won't have to contend with the compressions with the plugs removed...... But that's only me..... very sad me... :cry:
I don't know this method. I can only guess that it has something to do with looking at rocker positions relative to the crank timing mark positions.

Nearly.... the rocker positions of cyl 1 & 5 relative to the two TDC's
If it's not too much trouble to provide the procedure then it can only help in verifying, or otherwise, what I've done.

No problem, but I will do that separately if you have not guessed it all ready.
I'm trying to avoid removing the rocker covers because I used sealant on the gasket faces when I fitted the covers and if they're removed the gaskets will probably be useless afterwards and they don't seem to be easy to obtain.

I think, if you suspect the valve timing, the rocker covers will eventually have to come off.... sorry.
Hope this is of some help to you.
John
1990 GTA Atmo, 2003 Jaguar X type 2.5SE Auto, 2018 Kia Picanto GT-Line-S 1.25
no avatar
User

MFaulks

Rank

Non Member

Posts

1552

Joined

Sun Sep 28, 2008 4:25 pm


Has thanked: 45 times
Been thanked: 26 times

Re: Carburetor Problems

Postby MFaulks » Sun Dec 29, 2013 1:32 am

.
JohnB - if you need to remove the rocker covers, just carefully seperate the gasket from your silicone bond with a 10thou feeler or there abouts (note - not quoting any accuracy numbers - lol ), just gently go round. It should seperate easily enough and leave the gasket intact, works fine for me :-)

Talking of timing things in and accuracy, I remember doing a setup with 4x dial indicators - inlet and exhaust, accurate to one decimal place in mm reading to two, and pointers etc (it was a quad cam V engine), it was all to the book numbers and proceedure - spot on, and it was a complex geared arrangement (race engine), anyway this wise old guy came up and said you are doing that wrong, to check precisely you need to turn the assmebly over x times, count out and check the alignment of the gears again.. He was right, it was out by a tooth.. But as I found out from experience with this example, it's all relative to your initial datum(s), and understanding the mechanisms of compounding errors. Furthermore, and rather importantly the rounding errors in the published method (values), follower contact points etc that mean you need to know the intent of the method to apply in practice in an absolute fashion. As to the PRV, what I can say about the even-fire diagramatic description of the 4-6 cylinder alignment marks in the manual are incorrect.

JohnC - please describe your method, all good pointers are useful, and have you used it to time cams in from scratch, or just on existing assemblies?
... A diamond is only a piece of coal that did well under pressure... PRV afflicted, may be I need to squeeze harder!!!!

https://www.facebook.com/maftecfaulks
no avatar
User

MFaulks

Rank

Non Member

Posts

1552

Joined

Sun Sep 28, 2008 4:25 pm


Has thanked: 45 times
Been thanked: 26 times

Re: Carburetor Problems

Postby MFaulks » Sun Dec 29, 2013 2:27 am

johnb wrote:
MFaulks wrote:.
then loosen the distributor and advance it a bunch, sounds like you are well off and retarded .
Martin


Just a thought Martin. If you recall, on your recommendation, I fitted GTA camshafts on this engine build. The book timing for the A310 engine is 10 degrees BTDC. I believe the GTA timing is 15 degrees BTDC. With you saying it sounds retarded, should it now be timed for the GTA setting, if 15 degrees is correct, or some other advance number?


Hi John,

I wasn't talking a few degrees more like a big handful up to the distributor180 out scenario. Easy check, bring to TDC firing on number 1 (both rockers rocking with clearance, valves closed), plug out, ignition on, with your current dizzy position marked. Then manually swing the distributor back and forth from your original install position mark. Whilst you do this the spark plug no. 1 should be firing, if not then you have the phasing wrong. The other is check your condenser are good, but I think this is more likely to be firing phasing. This is a nice physical check that you can safely and positively verify each plug firing phasing.

Is the static timing set / verified with he vacuum disconnected?

GTA timing, best verified in terms of running performance when you are up and running, but I think likely yes.

Regards,
Martin
... A diamond is only a piece of coal that did well under pressure... PRV afflicted, may be I need to squeeze harder!!!!

https://www.facebook.com/maftecfaulks
User avatar
User

JohnC

Rank

Non Member

Posts

2120

Joined

Sun Dec 02, 2007 6:19 pm

Location

Jersey C.I.


Has thanked: 15 times
Been thanked: 83 times

Re: Carburetor Problems

Postby JohnC » Sun Dec 29, 2013 4:26 pm

MFaulks wrote:.JohnC - please describe your method, all good pointers are useful, and have you used it to time cams in from scratch, or just on existing assemblies?

Right.... here goes. Firstly, I have never used it before or read about it anywhere, just thought up a way to check the valve timing of this engine without disassembling too much....... however in my defence there is nothing clever about it just using commonly known principles of how the valves operate relative to the crank. I am assuming firing order is the same as the GTA... 163524.
First.... plugs out, (easier to turn over the engine with socket or spanner for more accuracy)... then rocker covers off.
Turn engine over till cyl 5 is on the rock..... Check inlet clearance of cyl 1 is 0.10mm and reset exhaust clearance to 0.10mm.
Rotate through 360` so cyl 1 is on the rock, check inlet clearance of cyl 5 is 0.10mm and reset exhaust to 0.10mm.
Now, as accurately as possible .....cyl 1 is still on the rock .. with index finger on one rocker and third finger on other, rotate engine one way or the other till you feel that the two valves have the same slight angle down towards the valves.... try and get that as equal as possible. You may find it easier if you take the plastic cap off the Alternator nut and with a socket and “T” bar on the nut, you can turn the engine back and forth but your last move with the bar must be in a clockwise direction to tension the chain correctly. Now check TDC with either drill bit or your own marks on timing cover. The engine should be spot on TDC,...... any variation by more than a degree or so will tell you that bank A (123) valve timing is not correct.
Now rotate engine through 360` so cyl 5 is on the rock as accurately as possible, and then check the TDC... like above, if not on TDC bank B (456) valve timing is out.
If all this checks out and everything falls into place, I would then be happy to look for some other problem for the misfiring.
It is not a method I would use to set up valve timing, but it should be good enough to say whether the valve timing is OK or not. If it is not, then Timing Chain cover off, and rotate engine and check timing marks as per page 86 of manual.
The only other thing to remember is if all is OK, then reset the exhaust valves of cly's 1 & 5 to 0.25mm.
Hope this makes sense to you.
John

PS..... after thought... here is page 86 for possible future use..... hopeing not though. :lol:

Image
1990 GTA Atmo, 2003 Jaguar X type 2.5SE Auto, 2018 Kia Picanto GT-Line-S 1.25
User avatar
User

johnb

Rank

Club Member

Club Member
Posts

858

Joined

Wed Sep 13, 2006 6:57 pm

Location

Cheshire


Has thanked: 13 times
Been thanked: 25 times

Re: Carburetor Problems

Postby johnb » Sun Dec 29, 2013 7:29 pm

Thanks John and Martin for your interest and contributions. Lots to respond to so maybe do in sections.

JohnC wrote:I am sure there are others who know these PRV engines better than me, so I expect some corrections along the way.


I don't consider myself to have expert knowledge of the PRV engine and would welcome any observations or corrections from the experts out there.

Firstly, JohnC, your setting method. I think I can understand the logic your approach but am I correct in thinking that yours is an offset crankpins, even fire engine? The reason I ask is because my A310 engine is equidistant crankpins, odd fire type. With this engine, if cylinder 5 rockers are rocking this is 30 degrees past TDC. The firing order is the same as you quote: 1,6,3,5,2,4 so for my engine this gives 0 + 150 + 90 + 150 (= 390, i.e 30 ATDC) degrees for cylinder 5 (cyl. 1 being the first zero). For an even fire crank, cylinder 5 would be at 0 + 120 + 120 + 120, i.e 360 degrees to cylinder 1 and correct for TDC.

Looking at the PRV manual on the website, I agree that the procedure is the same as in my manuals and pages 83 & 84 would apply to the A310. Pages 85 & 86 I think are only applicable to the even fire engine.

If my thinking is correct your method would be fine for the even fire engine but not for my engine.

I'll come back on the other points seperately and today's findings.

John
User avatar
User

JohnC

Rank

Non Member

Posts

2120

Joined

Sun Dec 02, 2007 6:19 pm

Location

Jersey C.I.


Has thanked: 15 times
Been thanked: 83 times

Re: Carburetor Problems

Postby JohnC » Sun Dec 29, 2013 9:20 pm

johnb wrote:JohnC, your setting method. I think I can understand the logic your approach but am I correct in thinking that yours is an offset crankpins, even fire engine?

No... the GTA Atmo has equidistant crankpins, but the GTA Turbo has the offset crankpins according to the info from Renault I have.
The reason I ask is because my A310 engine is equidistant crankpins, odd fire type. With this engine, if cylinder 5 rockers are rocking this is 30 degrees past TDC. The firing order is the same as you quote: 1,6,3,5,2,4 so for my engine this gives 0 + 150 + 90 + 150 (= 390, i.e 30 ATDC) degrees for cylinder 5 (cyl. 1 being the first zero).

OK.... if this is the case, then my system would only work completely on the Turbo with the offset crankpins....... as I said, I was just trying to think of a way to check your timing without you having to remove the Timing Chain cover. However, just a sudden thought..... I think it should be possible to check bank A (123) with my method, and that might give you an idea if one bank is correctly timed just in case something has gone horribly wrong.
Looking at the PRV manual on the website, I agree that the procedure is the same as in my manuals and pages 83 & 84 would apply to the A310. Pages 85 & 86 I think are only applicable to the even fire engine.

Page 85 is clearly, as you say, for the even fire engine, but page 86, I am sure would apply to both types as the chains and cogs can only rotate with a 2 to 1 reduction to the cam cogs for any engine, and if they went to the trouble of showing the timing marks at all, where is the other diagram ? ... but how could it be different. After all any differences for even or odd fire would be done on the rotational position of the individual cams on the camshafts themselves.
Thanks for pointing out the odd/even fire difference... that was something I did not consider. Sorry if I confused the issue. :oops: ..... we learn something new every day. :P
John
1990 GTA Atmo, 2003 Jaguar X type 2.5SE Auto, 2018 Kia Picanto GT-Line-S 1.25
User avatar
User

johnb

Rank

Club Member

Club Member
Posts

858

Joined

Wed Sep 13, 2006 6:57 pm

Location

Cheshire


Has thanked: 13 times
Been thanked: 25 times

Re: Carburetor Problems

Postby johnb » Sun Dec 29, 2013 10:32 pm

JohnC wrote: but page 86, I am sure would apply to both types as the chains and cogs can only rotate with a 2 to 1 reduction to the cam cogs for any engine,
John


Yes, could be but to check would mean removing the timing cover.
User avatar
User

johnb

Rank

Club Member

Club Member
Posts

858

Joined

Wed Sep 13, 2006 6:57 pm

Location

Cheshire


Has thanked: 13 times
Been thanked: 25 times

Re: Carburetor Problems

Postby johnb » Sun Dec 29, 2013 11:18 pm

johnb wrote:According to the books that I have, you set the crankshaft at TDC and then the 1,2,3 camshaft in the valve rocking position for cylinder 1 and fit the chain with its marks lined up on the crank sprocket and the cam sprocket. Then rotate the crankshaft 150 degrees clockwise and position 4,5,6 camshaft with cylinder 6 valves rocking and then fit the chain to the crank sprocket and cam sprocket marks.

johnC wrote:I have not come across this way of cam shaft timing, and I have to say I don't think it is a very accurate way to do this task. (First barrage here please :lol: )...... Now I have assumed that the 6cyl 310 PRV is the same as the GTA PRV but with a different ignition system. (Second barrage...) and as such I have looked at the process of setting the cam shafts the GTA way, and it does seem to be a bit more sophisticated and accurate way.
If you go to the Technical Help section of this site, Click on "PRV Engine" and download the "GTA & 610 Engine manual" English version, scroll down to pages 83 through 86, the process is certainly different. You may have to read it a few times to make sense of the different way to do the B bank but I think pages 83 & 84 are the right ones for the 310, but page 86 refers to both Bank B types and I have to assume that page 86 shows the final test of the process (Third barrage...)
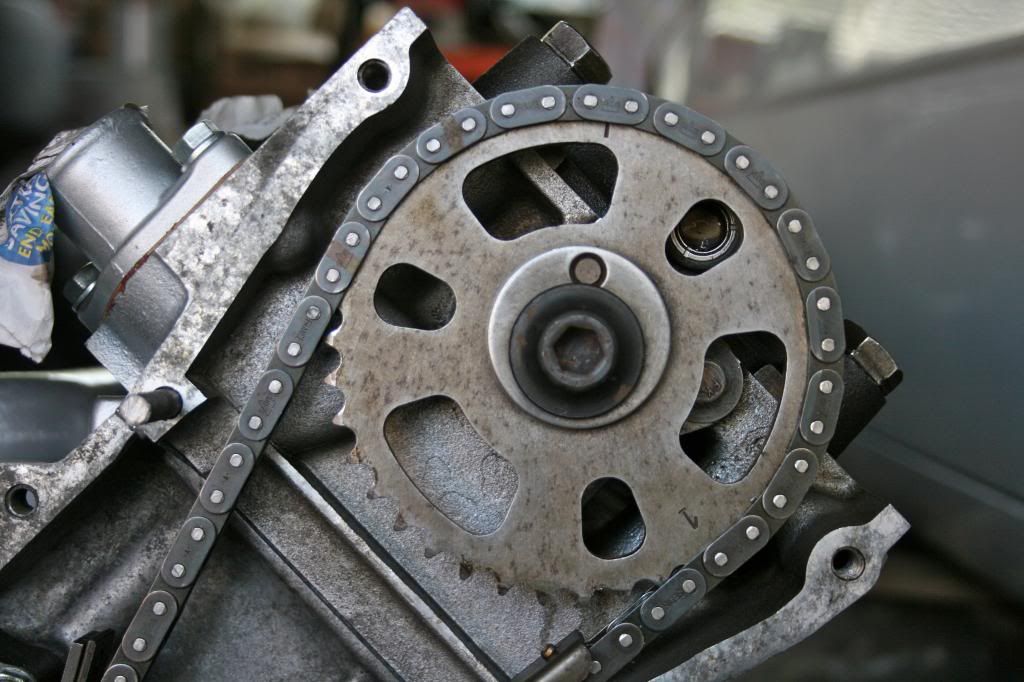
Unfortunately your pic of the timing chains does not show up the timing marks on the gear wheels sufficiently to comment further.
[quote]

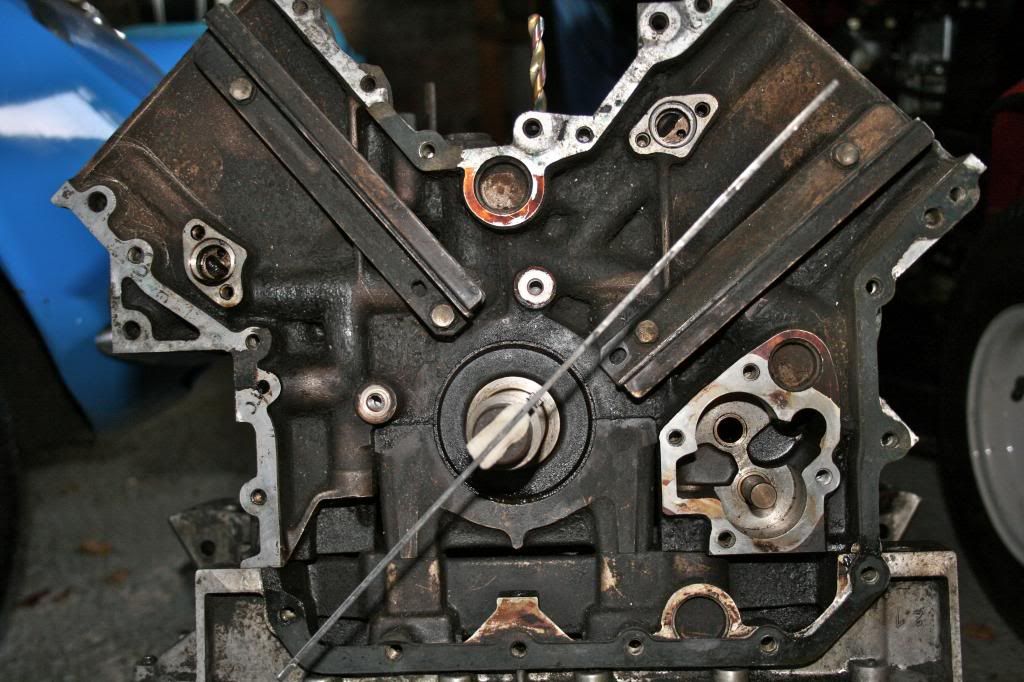
I wasn't correct in saying that the manuals I have say that you set the crankshaft at TDC. What they do say is the same as the PRV manual on the website, i.e. for 1,2,3 camshaft rotate the crank to set the crankshaft sprocket key to lie on the centreline of the 1,2,3 cylinder bank. The rest of the procedure is then the same.

Because I'd used actual TDC, with the 8mm drill through the block into the crank web, I wanted to see if there is a difference in the two approaches. I just happen to have a spare block with crankshaft so I put a drill through the TDC hole into the hole in the web and took this photo.
Image

As you can see, in this position the key does line up with the 1,2,3 cylinder bank centreline. I stuck the rod on the shaft end to show it more clearly. So, from this I conclude that you get the same result with either method unless I've missed something.

What I can't explain is why the manuals all refer to the key alignment and not the drill into the crankweb because that is a definite fixed reference. Again, maybe I've missed something. However, all my manuals do refer to the use of the drill when setting the timing plate position on the timing cover. You'd have to use that method when setting the plate because the key would be hidden.

By the way John, I used a degree wheel to do the 150 degree rotation accurately for the 4,5,6 bank.

Regarding the photo of my engine, the timing marks on the camshaft sprockets are directly in line with a line through the centre of the sprocket and the pin that locates the sprocket to the camshaft as in this photo with cylinder 1 in the rocking position. Image
User avatar
User

johnb

Rank

Club Member

Club Member
Posts

858

Joined

Wed Sep 13, 2006 6:57 pm

Location

Cheshire


Has thanked: 13 times
Been thanked: 25 times

Re: Carburetor Problems

Postby johnb » Mon Dec 30, 2013 3:28 pm

Some more boring stuff, yawn, please excuse. :roll:

MFaulks wrote:.
loosen the distributor and advance it a bunch, sounds like you are well off and retarded .
Martin


Haven't tried advancing the ignition yet but will do. My diagnostic skills are definitely retarded at the moment.

JohnC wrote:.
does your manual show which coil king lead goes to each of the distributor king lead inputs, and which coil 12v goes to each of the set of points..... as I am sure you know, any cross wiring in this area will lead to incorrect timing.


I have checked the coils LT wiring in relation to the two sets of points and it checks out correctly with 'A' points going to the 'A' coil and the king lead then going to the 'A' connection on the distributor cap. The 'B' points, etc all check out correctly. I did say earlier that I had changed this wiring so that the car was as the MDR diagram with the left hand coil being coil 'A'. This basically involved swapping the two king leads and the wires to the points, between the two coils. So I presume the circuits will be the same. I'll try swapping them back but, I'd be surprised if this makes any difference. Could be wrong though.

johnb wrote:To find TDC on the firing stroke of cylinder 1 again, I've been cranking the engine on the remote start with the ignition off, cylinder 1 spark plug out and stopping the cranking just after I feel the pressure coming out of the plug hole. The timing mark on the crank pulley then being close to TDC

JohnC wrote:I would be doing all of these tests with the plugs removed and a socket and ratchet lever on the crank pulley, that way you can back off if necessary and come back to a very accurate position of, say, TDC. and you won't have to contend with the compressions with the plugs removed


I was only doing this to get the rough TDC, firing position as the silencers were still on the car and in the way of my socket and breaker bar. I've now removed the silencers again for accurate rotation checks.

MFaulks wrote:if you need to remove the rocker covers, just carefully seperate the gasket from your silicone bond with a 10thou feeler or there abouts


Certainly worth a try if they do have to be taken off.

MFaulks wrote:I wasn't talking a few degrees more like a big handful up to the distributor180 out scenario. Easy check, bring to TDC firing on number 1 (both rockers rocking with clearance, valves closed), plug out, ignition on, with your current dizzy position marked. Then manually swing the distributor back and forth from your original install position mark. Whilst you do this the spark plug no. 1 should be firing, if not then you have the phasing wrong. The other is check your condenser are good, but I think this is more likely to be firing phasing. This is a nice physical check that you can safely and positively verify each plug firing phasing.


What I've done is bring to TDC on cylinder 1, took off the distributor cap, ignition on, king lead 'A' out of distributor cap and held close to the engine, flicked points 'A' and nice spark from king lead. Then rotated the crank 150 degrees clockwise and repeated the above with points 'B' and king lead 'B', again nice spark. So this seemed to verify the distributor timing.

I then marked the pulley with the approximate positions where cylinders 3,5,2 & 4 should fire relative to the timing plate, 1 & 6 being already marked by the two notches on the pulley (2nd notch 150 degrees behind the first notch when rotating clockwise, first notch being cylinder 1). Then removed all the plugs, refitted the distributor cap and put a plug on each lead. Earthed all the plugs, rotated the crank and each plug fired in the correct sequence and at the correct marked point on the pulley. So this seems to imply that the timing is close. However, all this is dependant upon knowing which TDC is cylinder 1 firing and not rocking. My only test is feeling the pressure rising at the cylinder 1 plug hole and the viewed position of the camshaft sprocket 4,5,6 through the small cover.
The condensors, by the way, are new.

MFaulks wrote:Is the static timing set / verified with he vacuum disconnected?


I did the static timing with a test lamp from the coil LT (RUP) terminal to earth. On points opening the lamp lights. Presumably you disconnect the vacuum if you're doing the timing with a strobe whilst the engine is running or cranking, i.e when pulling a vacuum and to avoid advancing the points.

When I removed the silencers there was a small pool of petrol in one of the exhaust manifolds so I imagine the engine was well and truly flooded. Not sure which way to proceed now other than to keep off the throttle and the forced opening of the twin choke butterflies. Could try some more advance, say 20 degrees but MF was thinking of major out of phase timing. Swap coil king and RUP leads back to pre-stripdown state. Recheck static timing and points gaps. Then what? Not sure at the moment.
no avatar
User

MFaulks

Rank

Non Member

Posts

1552

Joined

Sun Sep 28, 2008 4:25 pm


Has thanked: 45 times
Been thanked: 26 times

Re: Carburetor Problems

Postby MFaulks » Tue Dec 31, 2013 4:24 pm

.
I'm not seeing much wrong with your checks... umm... the only thing I would have done is swung the dizzy back and forth around the firing point than directly openning the points myself, so that you were proving the system as it operates than manual intervention, but that's only a minor thing and your approach as ever was very methodical. You have well flooded it as JohnC mentioned way back up the thread, so pretty much only going to pop and bang. I wouldn't play with the timing for now, sounds like you have the phasing right, and timing close enough to get it to run at idle (tuning you can do later). So I think you need to try less fuel... another thing you can do if you are getting a bit of plug wetting with excess cranking etc, is pull the plug leads off the plug connection ie have them pulled back a little so it arcs inside the lead to the plug contact as well, this will give the spark a very quick rise time that will help starting with wet plugs (only time it is useful mind...) whilst you are playing about.

Hope it works out.

Martin
... A diamond is only a piece of coal that did well under pressure... PRV afflicted, may be I need to squeeze harder!!!!

https://www.facebook.com/maftecfaulks
User avatar
User

johnb

Rank

Club Member

Club Member
Posts

858

Joined

Wed Sep 13, 2006 6:57 pm

Location

Cheshire


Has thanked: 13 times
Been thanked: 25 times

Re: Carburetor Problems

Postby johnb » Tue Dec 31, 2013 5:04 pm

MFaulks wrote:.
the only thing I would have done is swung the dizzy back and forth around the firing point than directly openning the points myself........ another thing you can do if you are getting a bit of plug wetting with excess cranking etc, is pull the plug leads off the plug connection ie have them pulled back a little so it arcs inside the lead to the plug contact as well.....


Thanks Martin, I take your point about moving the distributor body. I'll try both things.
PreviousNext


  • Advertisement

Who is online

Users browsing this forum: No registered users and 164 guests

Powered by phpBB ® | Renault' and 'Alpine' are trademarks of Renault S.A.S. or its subsidiaries and are used with kind permission of Renault France