GTA Le Mans Number 03 has a new owner!!

A place to showcase your pride and joy

Moderators: eastlmark, BIG_MVS, Test Moderator

User avatar
User

JohnC

Rank

Non Member

Posts

2120

Joined

Sun Dec 02, 2007 6:19 pm

Location

Jersey C.I.


Has thanked: 15 times
Been thanked: 83 times

Postby JohnC » Sun Mar 25, 2012 9:05 pm

Paul, I have just been out and took the triangular cover off to get to the mirror connector. Before we go on..... Where I wrote Brown/White read Brown/ Blue.... I misread the colour code.... sorry...must be the age :roll: .
The cable colours and positions on my mirror connector...relative to the connectors key way, are the same as the book, that is:-
Pin 1. Brown/ blue.... Pin 2. Brown/ red.... Pin 3. Brown/ yellow.... and Pin 4. Black. Note that the numbering does not follow in rotation, ie:- starting at No.1 and going clockwise, it goes 1 - 3 - 4 - 2.
I still believe that putting your meter across Brown/ blue & Brown/ red and seeing what you get when you push the joystick from side to side is the way forward.... and if there is no voltage there, then the switch must be checked. Let me know if this is the case and I can tell you what wires on the switch to check.

John
1990 GTA Atmo, 2003 Jaguar X type 2.5SE Auto, 2018 Kia Picanto GT-Line-S 1.25
User avatar
User

JohnC

Rank

Non Member

Posts

2120

Joined

Sun Dec 02, 2007 6:19 pm

Location

Jersey C.I.


Has thanked: 15 times
Been thanked: 83 times

Postby JohnC » Sun Mar 25, 2012 9:18 pm

What has happened to the edit facility :?: :?: :?: :?: :?: :?:

I have just reread your pin No`s against colour codes.
The pic in the book is misleading.....1,2,3 & 4 pin No`s must be seen from where the wires from the loom go into the connector, the book seems to imply that the numbers are seen from the pin side which is wrong..... hope that makes sense.

John
1990 GTA Atmo, 2003 Jaguar X type 2.5SE Auto, 2018 Kia Picanto GT-Line-S 1.25
User avatar
User

PaulC1959

Rank

Non Member

Posts

1147

Joined

Sun Oct 15, 2006 8:56 pm

Location

Bedfordshire


Has thanked: 10 times
Been thanked: 6 times

Postby PaulC1959 » Mon Mar 26, 2012 5:46 pm

JohnC wrote:What has happened to the edit facility :?: :?: :?: :?: :?: :?:

I have just reread your pin No`s against colour codes.
The pic in the book is misleading.....1,2,3 & 4 pin No`s must be seen from where the wires from the loom go into the connector, the book seems to imply that the numbers are seen from the pin side which is wrong..... hope that makes sense.

John


What you are saying is the book is saying the pin numbers are as if I was looking from the back of the connector, with the wires at that side and not the pins, I think? :wink:

I will check more at the weekend, I am preparing for Ofsted this week! :roll:

Paul
Venturi 260 - Saphir (Bleu)
Renault Sport Megane 230 F1 Team R26 - Liquid Yellow
Renault Sport Clio 197 - Ultra Red
Renault Megane Maxim 1.5 DCi - Extreme Blue (Daily Runner)
Minari RS - Coral Red
Smart Roadster Coupe 80 - Spice Red
User avatar
User

JohnC

Rank

Non Member

Posts

2120

Joined

Sun Dec 02, 2007 6:19 pm

Location

Jersey C.I.


Has thanked: 15 times
Been thanked: 83 times

Postby JohnC » Mon Mar 26, 2012 9:47 pm

PaulC1959 wrote:What you are saying is the book is saying the pin numbers are as if I was looking from the back of the connector, with the wires at that side and not the pins, I think? :wink:

Yes.... the book shows the pin numbers when you are looking into the connector which is attached to the mirror, therefore when the loom connector is plugged into it... the pin numbers follow through and are right when viewed where the loom wires enter the connector.
However now I have checked mine out and confirmed the colour coded wires, we can go on colours as opposed to pin numbers which makes it less confusing.
The solenoid is connected to the Brown/ yellow, and the Black, and the motor is connected to the Brown/ blue, and the Brown/ red, so those are the wires to concentrate on to check the motor operation........ don`t worry... we will get there in the end. :wink:
Looking back over what you have done... I see you have moved wires around in the mirror its self and suggested that they might have been like that from the factory.... I tend to think that that is not so. The wires need to be put back to where they were, if you have not done that already...... if necessary make sure they are the same as the drivers mirror which works correctly. I agree with you that the fault is most probably due to a faulty switch, but checking for a voltage on Brown/ blue and Brown/ red will, I am sure direct us to the switch, but we must check that out first.

John
1990 GTA Atmo, 2003 Jaguar X type 2.5SE Auto, 2018 Kia Picanto GT-Line-S 1.25
User avatar
User

PaulC1959

Rank

Non Member

Posts

1147

Joined

Sun Oct 15, 2006 8:56 pm

Location

Bedfordshire


Has thanked: 10 times
Been thanked: 6 times

Postby PaulC1959 » Mon Mar 26, 2012 10:59 pm

Hi John

Will swap the wires back and check what you suggest at the weekend.

Thanks

Paul.
Venturi 260 - Saphir (Bleu)
Renault Sport Megane 230 F1 Team R26 - Liquid Yellow
Renault Sport Clio 197 - Ultra Red
Renault Megane Maxim 1.5 DCi - Extreme Blue (Daily Runner)
Minari RS - Coral Red
Smart Roadster Coupe 80 - Spice Red
User avatar
User

PaulC1959

Rank

Non Member

Posts

1147

Joined

Sun Oct 15, 2006 8:56 pm

Location

Bedfordshire


Has thanked: 10 times
Been thanked: 6 times

Postby PaulC1959 » Sat Mar 31, 2012 5:33 pm

Hi John

I have swapped the wires at the back of the motor inside the door mirror on the passenger side back to the correct, white = white, black = black, brown = brown & blue = blue. Next I set my multi-meter up with the red probe in the brown & red wire and the black probe in with the brown and blue wire, this at the female connector for the passenger door, not at the mirror connector.

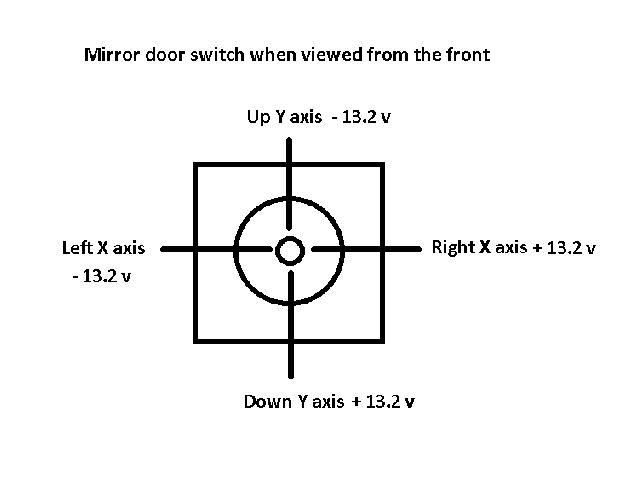
I moved the joystick of the switch in the x & y axis and recorded the readings with the engine running, see the picture below it is a bit rudimentary as I created it in MS Paint!

When I first moved the joystick in the X axis I got a +13.2v reading at the right position but nothing at the left position, next I moved the joystick through the Y axis and got a reading of +13.2v at the down position and nothing at the up position. I then moved the joystick up and down through Y axis several times and then got a reading of -13.2v when the joystick was in the up position, the +13.2v reading at the down position continued. Whilst the Y axis were being selected the drivers mirror could be heard to click even though the switch was in the passenger door position. Next I tried moving the joystick through the X axis and this time I found -13.2v at the left position and +13.2v continued at the right position.

I then flipped the switch to the driver’s door and found that the joystick did not always generate movement at the first attempt but once the joystick had been pushed to all positions several times all movement was restored.

Now that the wires at the back of the motor in the passenger door mirror have been connected correctly and reconnected to the loom, it only clicks when the Y axis is selected, and no movement or sound for the X axis.

What now sensei? :wink: :wink:


Image
Venturi 260 - Saphir (Bleu)
Renault Sport Megane 230 F1 Team R26 - Liquid Yellow
Renault Sport Clio 197 - Ultra Red
Renault Megane Maxim 1.5 DCi - Extreme Blue (Daily Runner)
Minari RS - Coral Red
Smart Roadster Coupe 80 - Spice Red
User avatar
User

JohnC

Rank

Non Member

Posts

2120

Joined

Sun Dec 02, 2007 6:19 pm

Location

Jersey C.I.


Has thanked: 15 times
Been thanked: 83 times

Postby JohnC » Sat Mar 31, 2012 7:56 pm

Paul... on the face of it your drawing shows what I would expect, so lets concentrate on the X axis only (left to right).... transfer the meter probes to where these two wires...Br/R & Br/bu... pass through the connector and appear where they leave the connector going to the mirror motor, if there is no problem with the connector, the same voltages will appear there, if they do, trace those wires into the mirror assembly and they should go to the motor..... put the probes on the motor and you should be getting the voltages there also.
If, as you say the Passenger mirror assembly worked correctly plugged into the drivers door connector, it does seem to suggest either a connector problem or a couple of broken wires. Following the voltages through to the motor should indicate where the fault lies.
You comment that the solenoid only clicks in the Y axis..... that is right, the same motor operates the X axis and the Y axis, the only difference is that in the Y axis, the solenoid is energised and mechanically transfers the motor from the X axis movement to the Y axis movement.
Try the above and see how you go. :wink:

John
1990 GTA Atmo, 2003 Jaguar X type 2.5SE Auto, 2018 Kia Picanto GT-Line-S 1.25
User avatar
User

PaulC1959

Rank

Non Member

Posts

1147

Joined

Sun Oct 15, 2006 8:56 pm

Location

Bedfordshire


Has thanked: 10 times
Been thanked: 6 times

Postby PaulC1959 » Sun Apr 01, 2012 7:51 pm

Latest update!!!

Today saw the repair for the passenger door mirror completed and both door cards refitted. Yipee. :lol:

Following John C’s instructions I finally found that the culprit to the non-functioning passenger door mirror was the final connector before the wires disappeared into the mirror housing. Basically it was not making particularly good connections and would either not work at all or work spasmodically, this was causing me to suspect the switch on the driver’s door but eventually It became clear. I have now closed up all of the female connectors on both mirrors and the rest of the door mirror loom and taped all connectors together, the end result is now I have fully functioning door mirrors every time I try them.

A BIG THANKS to John again for his invaluable help. :wink:

I will attempt a tidy up of the front boot space below and above the boot liner next I think. :roll:

Ciao.
Venturi 260 - Saphir (Bleu)
Renault Sport Megane 230 F1 Team R26 - Liquid Yellow
Renault Sport Clio 197 - Ultra Red
Renault Megane Maxim 1.5 DCi - Extreme Blue (Daily Runner)
Minari RS - Coral Red
Smart Roadster Coupe 80 - Spice Red
User avatar
User

JohnC

Rank

Non Member

Posts

2120

Joined

Sun Dec 02, 2007 6:19 pm

Location

Jersey C.I.


Has thanked: 15 times
Been thanked: 83 times

Postby JohnC » Sun Apr 01, 2012 10:12 pm

Glad to see you cracked it Paul. :D
1990 GTA Atmo, 2003 Jaguar X type 2.5SE Auto, 2018 Kia Picanto GT-Line-S 1.25
User avatar
User

PaulC1959

Rank

Non Member

Posts

1147

Joined

Sun Oct 15, 2006 8:56 pm

Location

Bedfordshire


Has thanked: 10 times
Been thanked: 6 times

Postby PaulC1959 » Mon Jul 23, 2012 10:41 am

We had a little run out in the Le Mans on Sunday, I needed something from Screw-fix and Jen needed a bit of Retail Therapy!! :lol: :lol: :lol:
As the weather was dry and sunny Jen decided to have her first serious drive of the car, she started with a run into Luton through traffic to Screw-fix and then she drove up the A6 to Bedford and the Interchange Retail Park. On the run up to Bedford she was able to push on a bit but always within the speed limit which did surprise me because she is a bit of a speed merchant usually and does like to feel the surge from a turbo! :shock:

I guess it was because it was her first drive of the car and I was in the passenger seat, previously in the Venturi she has given the loud pedal a fair old shove, but as she is a good girl, only ever on the straights. :wink:

Anyway, after the Therapy was over and with a few carrier bags on the back seat we drove home via a more winding route, again Jen pushed on when safe and within the speed limits all the way home, leaving me to bring the car up onto the driveway and into the back garden stating she was concerned about the big wheel arches. If the truth be known she is not keen on driving anything more than her little Clio on the driveway and even then she refuses to reverse that out of the back garden and onto the driveway. :roll:

When I asked her about her thoughts on the car they pretty much came out as she does like it a lot, she found the steering heavy at low speeds but liked how it felt at higher speeds. She liked the gear change and that the clutch is reasonably light in operation, this is important to Jen as she has had surgery on her left hip. She also felt the car was well balanced and solid through the bends.

Le Mans V Venturi 260: The Female Perspective
Next came the question that Juzz Black had asked me way back on page one of this thread, “How it compares to the Venturi?”
Her answer came back, The Le Mans has a better gear change and clutch than the Venturi, but despite that the Venturi is better and more comfortable to drive, but not by much, this did surprise me as I thought she would prefer the Le Mans because of the clutch and gear change. She then offered that as a passenger she feels they are both perfectly comfortable for long journeys and has no favourite in that respect.

Rear Suspension
On Sunday I jacked the car up at the back to check the rear brake pads and calipers out, primarily with concern in relation to the front pad problem I had on the Classic Le Mans trip, they seemed okay but will need changing soon’ish as both inner pads have between 4mm & 5mm of friction material remaining on them. It was then I was pleased to notice that the rear dampers are adjustable Spax Gas units, complete with “Krypton Gas”, I have checked out their website and all gas shocks appear to use Krypton Gas. :roll: :wink: Still it was a nice surprise.
Venturi 260 - Saphir (Bleu)
Renault Sport Megane 230 F1 Team R26 - Liquid Yellow
Renault Sport Clio 197 - Ultra Red
Renault Megane Maxim 1.5 DCi - Extreme Blue (Daily Runner)
Minari RS - Coral Red
Smart Roadster Coupe 80 - Spice Red
Previous


  • Advertisement

Who is online

Users browsing this forum: No registered users and 451 guests

Powered by phpBB ® | Renault' and 'Alpine' are trademarks of Renault S.A.S. or its subsidiaries and are used with kind permission of Renault France